Introduction
Today we will talk about one of the most popular frameworks in the world which is Spring, but we will focus mainly on the IoC container of this framework. In the Spring framework, the IoC container is considered as the heart of the whole framework because it’s responsible for the creation of the object, wiring the object together, configuring these objects, and handling the entire life cycle of these objects from their creation until they are completely destroyed.
So in the next sections, we will clarify more how the container does all those works.
Inversion of control (IoC)
After diving into other principles or notion we need first to understand what the IoC stands for.
IoC or inversion of control is a principle in software engineering by which the control of the object is transferred from the programmer into the framework especially a container, in our case the IoC container.
To understand this more, we will illustrate this principle by this example:
Imagine you are a programmer, and you want to write a code to solve a problem, after diving into coding you make calls to a library to work with. However, by IoC, the flow is inverted because the inversion of control enables the framework to take control of the flow of a program and make calls to your code.
Some advantages of IoC:
- Greater modularity of program
- Easy testing of code
Spring framework implements the inversion of control through different mechanisms such as:
- DI (dependency injection)
- Service locator pattern
- Strategy design pattern
- Factory pattern
I will talk about these mechanisms in future blogs
How does the IoC container work?
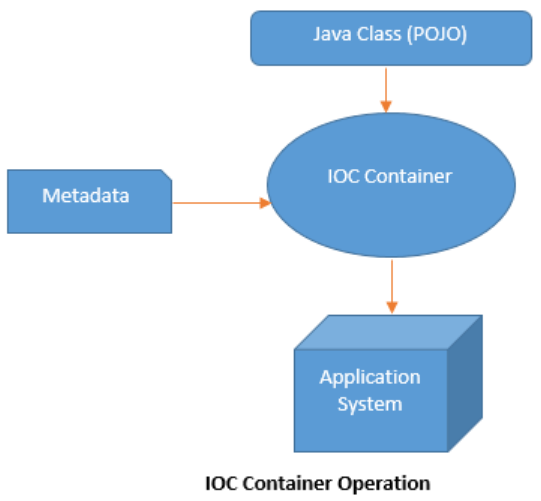
The Spring container doesn’t know how to instantiate our object alone so to make that we need to specify a configuration metadata to our container, this configuration can be specified through the XML file, Java code, Java annotations, then the spring container uses our POJO class as well as the configuration, and he can create the beans.
Bean: an object that is instantiated and managed by the Spring IoC container
Below, the diagram that illustrates how the container works:

Configuration of the IoC container
Configuration metadata represent how you, as an application developer, tell the Spring container to instantiate, configure, assemble the objects in your application.
This configuration metadata is nothing but bean definition, as we mentioned above, the metadata can be represented as:
- XML file
1
2
3
4
5
6
7
8
9
10
11
12
13
14
package com.melhamra;

public class MyClass {

    private String myField;

    public String getMyField() {
        return myField;
    }

    public void setMyField(String myField) {
        this.myField = myField;
    }
}
1
2
3
4
5
6
7
8
<?xml version="1.0" encoding="UTF-8"?>
<beans xmlns="http://www.springframework.org/schema/beans"
       xmlns:xsi="http://www.w3.org/2001/XMLSchema-instance"
       xsi:schemaLocation="http://www.springframework.org/schema/beans http://www.springframework.org/schema/beans/spring-beans.xsd">
    <bean id="myClass" class="com.melhamra.MyClass">
        <property name="myField" value="Hello World"></property>
    </bean>
</beans>
In the example above, we tell the Spring container to create a Bean of the class HelloWorld and instantiate the field “message” with the value “Hello World”
- JAVA code
Same things we will do but now with the java-based configuration.
1
2
3
4
5
6
7
8
9
10
11
12
13
14
15
16
package com.melhamra;

import org.springframework.context.annotation.Bean;
import org.springframework.context.annotation.ComponentScan;
import org.springframework.context.annotation.Configuration;

@Configuration
@ComponentScan("com.melhamra")
public class Config {
    @Bean("myClass")
    public MyClass getMyClass(){
        MyClass myClass = new MyClass();
        myClass.setMyField("Hello World");
        return myClass;
    }
}
- JAVA annotations
Starting from Spring 2.5 it became possible to configure our class using annotations. So instead of using the XML to describe the configuration, you can move the bean configuration to the class itself by using annotations(@Component, @Autowired…)
1
2
3
4
5
6
7
8
9
10
11
12
13
14
15
16
17
18
package com.melhamra;

import org.springframework.beans.factory.annotation.Value;
import org.springframework.stereotype.Component;

@Component("myClass")
public class MyClass {
    @Value("Hello World")
    private String myField;

    public String getMyField() {
        return myField;
    }

    public void setMyField(String myField) {
        this.myField = myField;
    }
}
Type of containers in the spring framework
There are two types of containers present in the Spring Framework.
1. Spring BeanFactory Container:
It is the simplest container present in the Spring framework which provides the basic support for DI (Dependency Injection). We use the following interface to work with this container.
org.springframework.beans.factory.BeanFactory
We will illustrate the implementation of this interface using the example above:
1
2
3
4
5
6
7
8
9
10
11
12
13
14
15
package com.melhamra;

import org.springframework.beans.factory.BeanFactory;
import org.springframework.beans.factory.xml.XmlBeanFactory;
import org.springframework.core.io.ClassPathResource;
import org.springframework.core.io.Resource;

public class Application {
    public static void main(String[] args) {
        Resource res = new ClassPathResource("Beans.xml");
        BeanFactory factory = new XmlBeanFactory(res);
        MyClass myClass = (MyClass) factory.getBean("myClass");
        System.out.println(myClass.getMyField());
    }
}
2. Spring ApplicationContext Container:
This is another container present in the spring container which adds extra enterprise-specific functionality. These functionalities include the capability to resolve textual messages from a properties file and publishing application events to the attentive event listeners. We use the following interface to work with this container.
org.springframework.context.ApplicationContext
1
2
3
4
5
6
7
8
9
10
11
12
package com.melhamra;

import org.springframework.context.ApplicationContext;
import org.springframework.context.annotation.AnnotationConfigApplicationContext;

public class Application {
    public static void main(String[] args) {
        ApplicationContext applicationContext = new AnnotationConfigApplicationContext(Config.class);
        MyClass myClass = applicationContext.getBean("myClass",MyClass.class);
        System.out.println(myClass.getMyField());
    }
}
if we will run these two programs, the result will be the same for both implementations:

4. BeanFactory vs ApplicationContext Container:
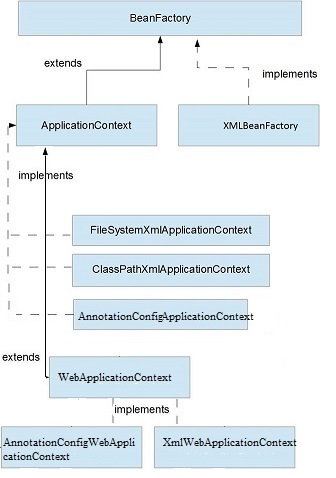
The ApplicationContext container is the superset of the BeanFactory container. It means that all functionality of the BeanFactory container is present in the ApplicationContext container. Therefore, ApplicationContext container is often preferred over BeanFactory container. BeanFactory is often used to build lightweight applications such as mobile devices, applet-based applications, etc. where data volume as well as speed is important. Below are the most commonly used ApplicationContext implementations.
• FileSystemXmlApplicationContext – Here, we have to provide the full path of the XML bean configuration file to the constructor in order to load the metadata of the beans from an XML file.
• ClassPathXmlApplicationContext – Here, we need to set CLASSPATH of the bean configuration XML file in order to load the metadata of the beans from an XML file.
• WebXmlApplicationContext – Here, the container loads the XML file within a web application which has metadata of all beans.

Conclusion
That was all for this blog, I hope you enjoy it and you understood all the points that we have touched on, if you have questions don’t hesitate to ask me.
if you want to test the examples above, below, you will find my Github code link:
IoC container Spring demo